Mitsubishi mini-split systems offer efficient heating and cooling solutions. Proper installation ensures optimal performance, energy efficiency, and safety. Always follow the official installation manual guidelines.
1.1 Overview of Mitsubishi Mini Split Systems
Mitsubishi mini-split systems are ductless, energy-efficient solutions for heating and cooling. They consist of an indoor unit and an outdoor unit connected by refrigerant piping. These systems offer precise temperature control, quiet operation, and flexibility for various spaces. Models like the MSZ and MZS series provide advanced inverter technology for optimal performance. They are ideal for residential and commercial use, ensuring comfort while minimizing energy consumption. Proper installation is crucial to maintain efficiency and safety, as outlined in the installation manual.
1.2 Importance of Proper Installation
Proper installation of Mitsubishi mini-split systems is crucial for safety, efficiency, and performance. Improper installation can lead to fire hazards, electric shocks, or water leakage. It may also result in reduced efficiency, higher energy bills, and a shorter system lifespan. Always follow the installation manual guidelines to ensure compliance with safety standards and optimal functionality. Incorrect installation can void warranties, so it’s essential to have a qualified technician handle the process. This ensures your system operates safely and efficiently for years to come.

Safety Precautions for Installation
Always follow safety guidelines to avoid fire hazards, electric shocks, or injuries. Never install the unit yourself; improper installation can lead to serious accidents or system damage.
Adhere to all safety precautions to ensure a secure installation process. Always disconnect power before starting work. Wear protective gear, including gloves and safety glasses. Ensure the area is well-ventilated and free from flammable materials. Never attempt installation without proper training or tools. Follow the manufacturer’s instructions precisely to avoid accidents or system damage. Proper installation is crucial for safety and efficiency. Always consult a professional if unsure about any step. Safety should never be compromised during installation.
Ensure all electrical connections are secure and meet local codes. Use properly rated wires and avoid overloaded circuits. Keep flammable materials away from the unit. Install a dedicated circuit breaker for the system. Ground the unit correctly to prevent electric shock; Follow the installation manual’s wiring diagram. Regularly inspect electrical components for damage. Never use damaged cords or plugs. Fire safety requires proper ventilation and unit placement. Always turn off power during maintenance. Compliance with electrical standards is essential for safe operation. Essential tools include a drill, screwdrivers, and wrenches. Materials like refrigerant piping, insulation, and electrical connectors are necessary. Always refer to the installation manual. The installation requires specific tools for efficiency and safety. A drill, screwdrivers, and wrenches are essential for mounting and securing units. Pliers and pipe cutters are needed for handling refrigerant lines. Ensure you have voltage testers for electrical connections and levels to align units properly. Additionally, a vacuum pump is necessary for evacuating the system. Always use tools as specified in the installation manual to avoid damage or safety risks during the process. Ensure you have all required materials, including copper piping, flare connections, and insulation. Drainage kits and condensate pumps are essential for proper water management. Additionally, obtain mounting brackets, vibration pads, and weatherproof covers for outdoor units. Electrical supplies like wires and connectors must meet specifications. Insulation materials and vacuum-rated tubing are crucial for refrigerant lines. Always refer to the installation manual for specific requirements to ensure compatibility and safety during the setup process. Begin with selecting a suitable location for both indoor and outdoor units. Install the indoor unit securely, followed by the outdoor unit, ensuring proper alignment and spacing. Connect refrigerant piping, electrical wiring, and drainage systems carefully. Finally, test the system to ensure proper functioning, airflow, and drainage. Always follow the manual’s detailed instructions for each step to guarantee safe and efficient operation. Selecting the right location is crucial for optimal performance. Ensure the indoor unit is installed on a sturdy wall, avoiding direct sunlight and heat sources. The outdoor unit should be placed in a well-ventilated area, away from obstructions and direct sunlight. Proper drainage and accessibility for maintenance are essential. Ensure the location complies with the manufacturer’s guidelines for distance between units and avoid areas prone to water accumulation or extreme weather conditions. This ensures efficient operation and longevity of the system. Install the indoor unit on a sturdy wall, ensuring it is level and securely fastened. Follow the installation manual for precise mounting bracket placement. Drill holes carefully to avoid damaging the wall or unit. Connect the drainage system to ensure proper water flow. Position the unit away from direct sunlight and heat sources for optimal performance. Double-check all connections and ensure the unit is firmly attached to prevent vibration or movement. Proper installation ensures efficient operation and longevity of the system. Install the outdoor unit on a firm, level base, ensuring proper drainage and ventilation. Follow the installation manual for correct piping and electrical connections. Secure the unit tightly to prevent vibration. Ensure the unit is positioned away from direct sunlight and heat sources. Proper installation ensures efficient performance and longevity. Use the recommended tools and materials for secure and safe setup. If unsure, consult a professional to avoid potential issues. Connect refrigerant piping according to the installation manual. Use a flare tool to secure connections tightly. Inspect for leaks using a gas leak detector. For wiring, match colored wires to the correct terminals as per the diagram. Ensure all connections are secure and insulated. Follow safety guidelines to avoid electrical hazards. Test the system after completing connections to ensure proper functionality. Proper piping and wiring are crucial for efficient operation and safety. After installation, test the system to ensure proper functioning. Check for refrigerant leaks, verify drainage, and confirm ventilation efficiency. Ensure all components operate smoothly. After installation, test the Mitsubishi mini-split system thoroughly. Ensure the indoor and outdoor units operate in sync, checking for proper cooling, heating, and airflow. Verify that the remote control functions correctly, including temperature adjustments and fan speed settings. Inspect for any refrigerant leaks and confirm that drainage systems are working efficiently. Ensure all electrical connections are secure and test the system under various operating modes to validate performance and efficiency. Proper drainage and ventilation are critical for Mitsubishi mini-split systems. Ensure the drain hose is unobstructed and securely connected to prevent water accumulation. Check the drain pan installation to avoid leaks. Verify that the outdoor unit has adequate clearance and airflow to ensure proper ventilation. Avoid obstructions near the unit to maintain efficient operation. Refer to the installation manual for specific guidelines and perform regular maintenance checks to prevent mold growth or reduced system efficiency. Regular maintenance ensures efficiency and longevity. Common issues include drainage problems and sensor malfunctions. Always refer to the installation manual for troubleshooting guidelines. Regular maintenance is crucial for optimal performance. Clean air filters monthly to ensure airflow and efficiency. Inspect and clean the outdoor unit’s coil to prevent debris buildup. Check drainage systems to avoid leaks and water damage. Schedule professional servicing annually for detailed inspections. Ensure proper thermostat settings and update smart controls as needed. Refer to the installation manual for specific maintenance schedules and guidelines to maintain warranty validity and system longevity. Common issues include improper drainage, leading to leaks, and sensor malfunctions. Check condensate drains regularly and ensure proper installation. If the unit does not cool or heat, verify thermostat settings and refrigerant levels. For error codes, consult the manual or contact Mitsubishi support. Regularly cleaning filters and coils can resolve airflow issues. Addressing these problems promptly prevents system failure and ensures efficient operation. Always refer to the troubleshooting guide in the installation manual for detailed solutions and procedures. Mitsubishi mini-split systems feature user-friendly controls for temperature, fan speed, and operation mode. Remote controls offer convenience, while smart thermostats enable advanced scheduling and energy management; The remote control for Mitsubishi mini-split systems allows users to adjust temperature, fan speed, and operation modes. Features include Cool, Heat, Dry, and Fan modes, with additional options like Turbo for rapid cooling and Eco mode for energy efficiency. The remote also enables smart thermostat integration, offering advanced scheduling and energy management. Proper use of these features ensures optimal performance and comfort. Always refer to the manual for detailed instructions and troubleshooting guidance to maximize system efficiency and user satisfaction. Integrating a smart thermostat with your Mitsubishi mini-split enhances control and energy efficiency. Ensure compatibility by checking the system’s specifications. Connect the thermostat to the indoor unit following the installation manual’s wiring diagram. Use the remote control or mobile app to configure settings, enabling features like scheduling and geofencing; Smart integration allows for seamless operation, optimizing comfort and energy savings. Proper setup ensures all features function correctly, providing a modern and efficient heating and cooling experience tailored to your needs. Always follow the manual for precise installation steps. Mitsubishi mini-split systems come with comprehensive warranty packages, covering parts and labor for specified periods. For detailed warranty terms, refer to the product’s installation manual. Additionally, Mitsubishi offers dedicated customer support through authorized dealers and online resources. Contact their support team for assistance with installation, maintenance, or troubleshooting. Warranty claims require proof of proper installation by certified technicians, ensuring compliance with manufacturer guidelines. Utilize Mitsubishi’s support network to maximize system performance and resolve any issues promptly, maintaining your investment’s longevity and efficiency.2.1 General Safety Guidelines
2;2 Electrical and Fire Safety Measures
Tools and Materials Required
3.1 Essential Tools for Installation
3.2 Necessary Materials and Accessories
Installation Steps
4.1 Selecting the Installation Location
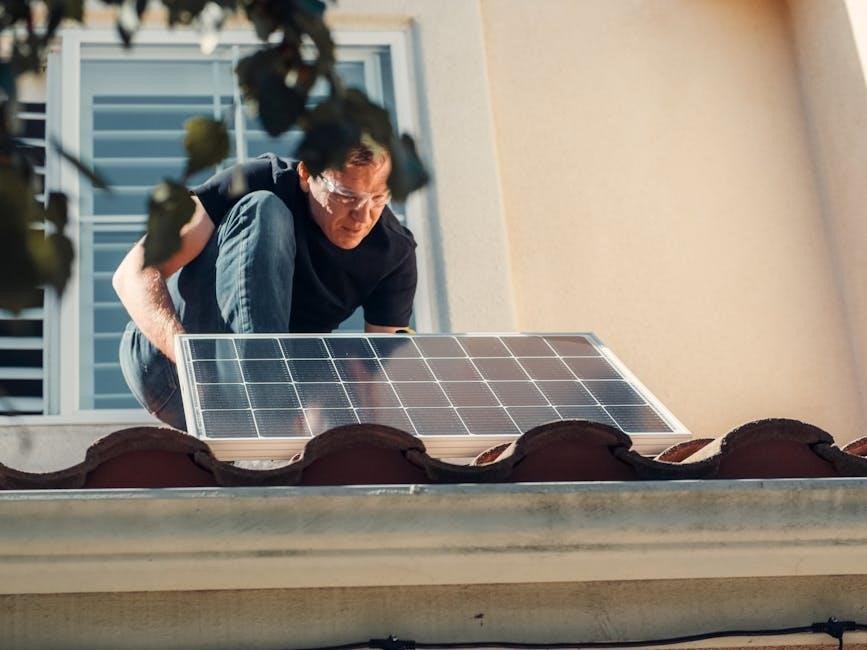
4.2 Installing the Indoor Unit
4.3 Installing the Outdoor Unit
4.4 Connecting Refrigerant Piping and Wiring

Post-Installation Checks and Tests
5.1 Testing the System for Proper Functioning
5.2 Ensuring Correct Drainage and Ventilation

Maintenance and Troubleshooting
6.1 Regular Maintenance Tips
6.2 Common Issues and Solutions
User Operation and Controls
7.1 Understanding the Remote Control Features
7.2 Setting Up Smart Thermostat Integration
Warranty and Support Information