Coloring is a versatile and therapeutic activity enjoyed by people of all ages, offering relaxation, creativity, and self-expression. It helps reduce stress, builds focus, and enhances fine motor skills while fostering artistic exploration. With various techniques and tools, coloring allows individuals to bring vibrant life to designs, making it a fulfilling hobby for everyone.
Whether you’re an adult seeking mindfulness or a child developing creativity, coloring provides endless possibilities for artistic growth and personal enjoyment. It’s a simple yet powerful way to unwind and express oneself through color and design.
1.1 What is Coloring?
Coloring is the art of using colors to bring designs, patterns, or images to life. It’s a popular activity for both children and adults, offering a creative outlet for self-expression and relaxation. Whether using colored pencils, markers, or digital tools, coloring involves filling spaces with hues to create visually appealing results. It’s a therapeutic practice that fosters mindfulness, reduces stress, and enhances focus. This versatile hobby allows anyone to explore their artistic side, regardless of skill level.
1.2 Benefits of Coloring for Adults and Children
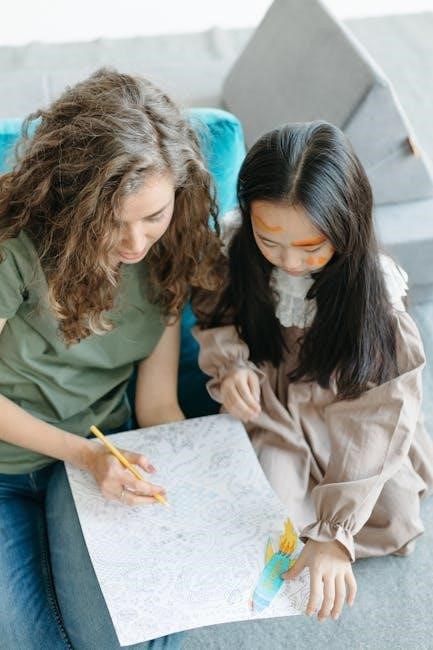
Coloring offers numerous benefits for both adults and children. For adults, it provides stress relief, promotes mindfulness, and enhances focus. It also fosters creativity and can serve as a therapeutic outlet. For children, coloring improves fine motor skills, hand-eye coordination, and color recognition. It encourages self-expression, patience, and concentration, while also aiding in emotional development. Both age groups can enjoy the calming effects and sense of accomplishment that come from creating something beautiful and personalized.
Whether it’s a relaxing escape for adults or a learning tool for kids, coloring is a universal activity that nurtures personal growth and well-being. Its versatility makes it accessible to everyone, regardless of age or skill level, offering a simple yet powerful way to unwind and express oneself creatively.
Essential Coloring Supplies
High-quality colored pencils, vibrant markers, and smooth pens are must-haves for coloring. Pair these with sturdy, acid-free paper for optimal results; Erasers and sharpener tools are also handy.
2.1 Colored Pencils
Colored pencils are a popular choice for coloring due to their precision and blendability. They come in a wide range of vibrant colors and are ideal for detailed work. Using light pressure creates soft hues, while heavier pressure produces deeper tones. Layering and blending techniques can achieve rich, textured effects. Wax-based pencils are durable and mix well, making them a favorite among both beginners and experienced artists for creating stunning, detailed artwork.
2.2 Markers and Pens
Markers and pens offer vibrant, quick-drying ink, making them ideal for bold, detailed coloring. They are perfect for layering and blending colors to achieve smooth transitions. Tips vary in size, allowing for both fine details and broad strokes. Some markers have dual tips, offering versatility in one tool. Pens are great for outlining and adding intricate patterns. When using markers, work in light layers to avoid bleeding and ensure even color distribution for professional-looking results.
Experimenting with different marker nibs and pen styles can enhance your coloring by adding texture and depth to your artwork.
2.4 Coloring Books and Papers
Choosing the right coloring books and papers is essential for a satisfying experience. Look for books with high-quality, acid-free paper that resists bleeding and fading. Smooth or textured finishes suit different mediums, while thick paper is ideal for layered techniques. Themes vary widely, from abstract patterns to nature scenes, offering something for every interest.
Select books with durable binding for long-lasting use. Consider seasonal or thematic designs to match your mood or occasion. The right paper ensures vibrant colors and precise details, enhancing your artistic journey.
Basic Coloring Techniques
Mastering basic techniques like shading, blending, and layering is key to creating vibrant, detailed designs. These methods add depth, texture, and realism to your artwork effortlessly.
Experiment with different strokes and pressures to achieve desired effects, transforming simple outlines into stunning, lifelike creations that reflect your unique style and creativity.
3.1 Shading and Highlighting
Shading and highlighting are fundamental techniques that add dimension and depth to your coloring. By using light and dark tones, you can create the illusion of three-dimensionality and draw attention to specific areas of your design. Start with light strokes to establish base tones, then gradually build darker shades to enhance shadows. Highlights can be added by leaving areas uncolored or using lighter colors to create a glowing effect. This method is especially effective for creating realistic and visually appealing artwork. Practice these techniques to elevate your coloring and make your designs stand out. Always remember, shading and highlighting are all about balance and control, ensuring your work looks polished and professional. With patience and practice, you can master these essential skills and bring your colorings to life.
3.2 Blending Colors
Blending colors is a technique that creates smooth transitions between hues, adding realism and depth to your artwork. Use light layers to build up colors gradually, allowing each layer to blend seamlessly into the next. For colored pencils, apply gentle pressure and layer strokes in the same direction. With markers, overlap colors slightly or use blender pens to merge tones. This method is ideal for creating soft gradients, skies, or natural textures. Practice blending to achieve harmonious color combinations and elevate your designs. It’s a key skill for creating professional-looking results.
3.3 Layering Colors
Layering colors involves building up hues in stages to achieve depth and richness. Start with light layers, gradually increasing intensity to prevent over-saturation. This technique allows for precise control over color intensity and blending. For colored pencils, layering thin strokes creates vibrant, detailed areas. With markers, layering can enhance shadows and highlights. Experiment with layering to add dimension and complexity to your designs, making your artwork stand out with a professional finish.
3.4 Creating Texture
Creating texture adds realism and depth to your artwork. Techniques like hatching and stippling can mimic surfaces such as wood, fabric, or stone. Use varied line patterns or dot density to suggest rough or smooth textures. For grass, short, random strokes work well, while long, straight lines can depict wood grain. Experiment with layering and pressure variation to enhance texture, making your colored designs more engaging and visually interesting. This method brings life to your artwork, capturing the essence of different materials and objects.
Advanced Coloring Techniques
Explore intricate methods like cross-hatching, stippling, and burnishing to add complexity and dimension. These techniques elevate your work, creating dynamic visuals and enhancing your artistic expression.
4.1 Cross-Hatching
Cross-hatching is a sophisticated technique involving layered, intersecting lines to create depth and texture. By varying line density and angle, you can achieve shadows, highlights, and intricate details. This method is ideal for adding dimension to shapes and forms, making your artwork more visually engaging. Practice different line pressures and patterns to master this versatile and impactful style, enhancing your coloring projects with professional flair.
4.2 Stippling
Stippling is a precise and artistic technique that involves creating images using small, carefully placed dots. By varying the density and spacing of these dots, you can achieve a range of tonal values and textures. This method is particularly effective for producing detailed, high-contrast designs. While it can be time-consuming, stippling offers a unique way to add depth and visual interest to your coloring projects. Experiment with different dot patterns to master this intricate yet rewarding style.
4.3 Burnishing
Burnishing is an advanced coloring technique that involves applying heavy pressure with a colored pencil or marker to blend and polish colors. This method creates smooth, even transitions and vibrant, luminous hues. It is particularly effective for detailed areas, such as small spaces or intricate designs. By layering colors and pressing firmly, you can achieve a polished finish that enhances the depth and richness of your work. This technique is ideal for adding shine and dimension to specific elements in your coloring projects.
Color Theory Basics
Color theory explores how colors interact, focusing on the color wheel, primary and secondary hues, and complementary tones. Understanding these basics helps create harmonious color schemes and visually appealing effects in your artwork.
5.1 Understanding the Color Wheel
The color wheel is a circular diagram displaying primary colors—red, blue, and yellow—and secondary colors—orange, green, and violet. It illustrates how colors relate, with primary hues forming the base and secondary colors created by mixing them. The wheel also shows complementary colors, which are opposite each other, enhancing contrast when used together. Understanding this structure helps in selecting harmonious color schemes and achieving desired visual effects in coloring projects.
5.2 Choosing Color Schemes
Choosing the right color scheme enhances the visual appeal of your coloring project. Start by selecting a base color, then add complementary or analogous hues for harmony. Consider the 60-30-10 rule: 60% dominant color, 30% secondary, and 10% accent. Warm colors like red and orange evoke energy, while cool tones like blue and green create calm. Experiment with monochromatic schemes for a cohesive look or bold contrasts for a striking effect to achieve a professional finish.
Tips for Specific Coloring Mediums
Understanding the unique qualities of each medium is key to achieving stunning results. Colored pencils excel at layering, while markers offer vibrant, bold colors. Pastels create soft textures, and digital tools provide endless customization. Always test tools on scrap paper first and adjust pressure for desired effects. Properly maintaining your supplies ensures longevity and optimal performance in your coloring projects.
6.1 Working with Colored Pencils
Colored pencils are a versatile medium, offering precise control and rich color. Start with light layers, gradually building depth by layering darker shades. Use gentle pressure for soft hues and firmer strokes for bold tones. Experiment with blending by layering complementary colors. To enhance details, use sharpened pencils for fine lines. Always work on high-quality paper to prevent smudging and ensure vibrant results. Practice techniques like shading and burnishing to create stunning, professional finishes.
6.2 Mastering Markers
Markers are vibrant tools for bold, smooth coloring. Start by layering light shades, gradually building depth with darker tones. Use the tip size to control details, and blend colors by layering complementary hues. Feathering techniques can create soft transitions, while quick strokes prevent over-saturation. Experiment with alcohol-based markers for seamless blending. Always test colors on scratch paper and choose high-quality markers for consistent results. Practice shading and layering to achieve professional, vibrant finishes in your designs.
6.3 Using Pastels
Pastels offer a soft, delicate way to color, creating ethereal effects. Start with light layers, blending colors gently with your finger or a tortillon for smooth transitions. Use hatching or stippling to add texture and depth. Fixative can be applied to prevent smudging. Opt for textured paper to enhance pastel vibrancy. Experiment with layering and blending techniques to achieve unique, dreamy results in your artwork, making pastels a versatile medium for both subtle and dramatic effects.
6.4 Digital Coloring Tools
Digital coloring tools offer unparalleled versatility and precision, allowing artists to explore limitless creative possibilities. Programs like Procreate, Adobe Photoshop, and digital drawing tablets provide intuitive interfaces for layering, blending, and adjusting colors with ease. Undo features and customizable brushes enable experimentation without fear of mistakes, making digital coloring a flexible and rewarding medium for artists of all skill levels.
Use pressure-sensitive styluses for varying line weights and textures. Experiment with digital layering to build depth and dimension. Save and revisit your work effortlessly, making adjustments as you refine your technique. Digital tools also allow for vibrant color schemes and effects that may be harder to achieve with traditional mediums, offering a modern twist to the coloring experience.

Common Mistakes to Avoid
Common mistakes include over-saturating colors, incorrect layering, and improper blending. Avoid these by using light layers, testing colors, and blending gradually for balanced, vibrant results.
7.1 Over-Saturating Colors
Over-saturating colors can make your artwork look muddy and lose detail. To avoid this, use light, gradual layers and allow each layer to dry before adding more. Start with softer shades and build intensity slowly. Over-saturating is common with markers and wet media, so test colors on a separate sheet first. Blot excess ink or pigment before applying to prevent overloading the paper. This ensures vibrant, controlled results without ruining your design.
7.2 Incorrect Layering
Incorrect layering can ruin your coloring by muddying colors or causing paper damage. Avoid applying too many layers too quickly, as this can overwhelm the design. Start with light layers and build gradually, allowing each to dry before adding more. Heavy layering can mix colors unintendedly, making them dull or over-saturated. Always test layering techniques on a separate sheet first to ensure desired results and prevent irreversible mistakes in your artwork.
Inspiration and Creativity
Inspiration for coloring is everywhere—nature, art, or personal experiences. Experiment with colors and techniques to spark creativity and bring your unique vision to life. Creativity knows no bounds!
8.1 Finding Inspiration
Finding inspiration for coloring can be as simple as exploring nature, browsing art, or reflecting on personal experiences. Look to patterns, colors, and textures around you—like blooming flowers or vibrant sunsets—to spark ideas. Social media and coloring communities also offer endless motivation, showcasing diverse styles and techniques. Embrace curiosity and let your surroundings guide your creativity, turning everyday sights into beautiful, colorful expressions.
8.2 Experimenting with New Techniques
Experimenting with new techniques can elevate your coloring to the next level. Try cross-hatching, stippling, or blending to add depth and texture. Don’t be afraid to step out of your comfort zone—layering colors or mixing mediums can create unique effects. Practice tutorials or online guides to master specific methods. Join coloring communities to discover fresh ideas and inspire your creativity. Remember, experimentation is key to growth, so embrace new challenges and enjoy the process of learning.
Finishing Touches
Finishing touches bring your artwork to life. Review your piece, add final details, and seal it to protect your creation. These steps ensure a polished, professional result.
9.1 Enhancing Details
Enhancing details elevates your artwork by adding depth and realism. Use fine-tip pens or small brushes to refine lines and patterns. Layering colors can create intricate textures, while contrast highlights focal points. Shading and highlighting techniques bring dimension to your work, making it visually engaging. Pay attention to small elements like eyes or intricate patterns to add personality. These finishing flourishes transform your piece into a polished, professional creation.
9.2 Sealing Your Work
Sealing your colored artwork protects it from smudging, fading, or damage; Use a fixative spray or varnish to preserve your work, especially with mediums like colored pencils or pastels. Apply thin, even coats, allowing each layer to dry before adding more. For digital or marker-based art, consider framing behind glass or using UV-protective sprays. Sealing ensures your masterpiece remains vibrant and intact, while also enhancing its professional finish and longevity.